
It’s the post (some of) you have been waiting for! (Please don’t get freaked out by the word count; it’s largely from the photo captions.)
This one’s for all the people who like looking at my photos from my previous Miss Fisher’s costume exhibition post. (And for any lady looking for gorgeous, fashionable, and sassy costume ideas for a 1920’s party and who doesn’t just want to go as a flapper.)
For the rest of my patient followers, I’m sorry if this one bores you to tears. I hope you’re Miss Fisher fans, too?
I bought our tickets prior to the exhibition opening in May, and have only just gotten around to going! Shame on me. Luckily it turned out to be a lovely day to visit. The driveway up to the Rippon Lea mansion was bursting with colour and looked more attractive than ever!

I love the driveway at Rippon Lea Estate
Good thing we had prepaid tickets – even though there wasn’t (at this point) a queue out the door, the staff were telling other visitor arriving behind us that they had to wait before being admitted if they hadn’t purchased their tickets online. But there was a cafe set up in the old stables around the corner, so I guess waiting there was nicer than standing around out the front.

The ticket booth was out the front of the mansion this year, if you hadn’t prepaid
After we heard the usual “Don’t touch the costumes. No flash photography.” speech, we were let loose to wander and sigh over Marion Boyce’s creations to our hearts content. And there was a lot of ooh-ing and aah-ing going on.
I started in the conservatory, where the tennis outfits from Episode 7 “Game, Set & Murder” were displayed.

Phryne’s tennis outfits

Your blogger, hard at work in the conservatory, trying to photograph every detail – photo by @s_powell
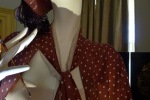
Phryne’s Tennis Coat & Tennis Outfit, Episode 7 “Game, Set & Murder”
-
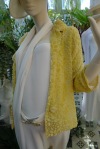
- Phryne’s Tennis Coat – 1920’s buttercup silk velvet jacket (courtesy of Adrienne O’Brien), with winter white silk faile tunic and pant.
-

- 1920’s Bakelite carved buckle (yellow flower and leaf pattern with black highlighting and jewelled metal clasp)
-

- Phryne’s tennis hats
-

- Phryne’s white fine straw hat with yellow feather trim
-

- Phryne’s fine straw hat with petersham and 1920’s rosette
-
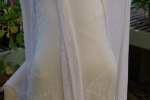
- Phryne’s white silk embossed bias cut dress with white velvet burnout coat with godets
-

- Sleeve of Phryne’s white velvet burnout coat
-

- Phryne’s tennis shoes
-

- Story behind Phryne’s lemon velvet burnout coat
-

- Marion Boyce on choosing tennis outfits
Detective Inspector Jack Robinson’s Tennis Outfit, also from Episode 7 “Game, Set & Murder”
 with grey knit tie (& staw panama?) #MFMM Series 3 Ep 7, 2015 \"Game, Set & Murder\" Miss Fisher Murder Mysteries, Detective Inspector Jack Robinson")

The American tennis player, Angela’s, St Tropez inspired outfit from Episode 7 “Game, Set & Murder”
-

- St Tropez inspired leisure wear patterned silk chiffon dress, black silk satin short, black straw hat w matching scarf, 1920’s bakelite sunglasses & ivory bangle & necklace – worn by American tennis player ‘Angela’
-

- Detail of ivory necklace, button and St Tropez inspired dress
-

- Marion Boyce on the St Tropez outfit
Angela’s Tennis Soiree Dress from Episode 7 “Game, Set & Murder”
-

- Tennis Soiree Dress worn by ‘Angela’ – red devore dress and cape with mango silk slip, and 1920’s silk velvet handbag with Lucite clasp
-
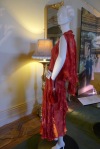
- Tennis Soiree Dress worn by ‘Angela’
-

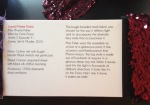
- Comments on Angela’s Tennis Soiree Dress
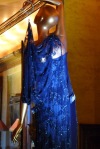
Blue Sequin Teal Sheer Dress, worn by ‘Pearl’ (aka the victim) in episode 1 “Death Defying Feats”
-

- Blue Sequin Teal Sheer Dress, worn by ‘Pearl’
-

- Detail of pearlescent sequins mounted on silk chiffon
-

- Bloodied pearl headpiece worn by ‘Pearl
-

- Comments on Pearl’s Blue Sequin Teal Sheer Dress
Dr Elizabeth MacMillan’s Tuxedo, worn in Episode 8 “Death do us Part”


Phryne’s “Smokey” Dress worn in Episode 4 “Blood and Money”
-

- Phyrne’s “Smokey” dress – silk chiffon with bugle beads and luminescent discs. Crystal beaded straps and smokey mauve silk under slip. 1920’s French diamante necklace – front view
-

- Details of Phyrne’s “Smokey” dress – silk chiffon with bugle beads and luminescent discs. Crystal beaded straps and smokey mauve silk under slip. 1920’s French diamante necklace
-

- Phyrne’s “Smokey” dress – silk chiffon with bugle beads and luminescent discs. Crystal beaded straps and smokey mauve silk under slip. 1920’s French diamante necklace, back view
-

- Comments on Phryne’s dress ‘Smokey’
Phryne’s dress “The Italian” worn in Episode 3 “Murder & Mozzarella”
-

- Phyrne’s dress “The Italian” – black beaded Chantilly lace dress, purple silk under slip, with 1920’s gold and crystal pendant
-

- Detail of Phyrne’s “The Italian” bodice and pendant – black beaded Chantilly lace dress, purple silk under slip, with 1920’s gold and crystal pendant
-

- Comments on Phryne’s dress ‘The Italian’
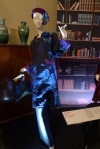
Phryne’s Liquid Flame Dress from Episode 7, “Game, Set & Murder”
-

- Phryne’s “Liquid Flame Dress” – Cotton net with bugle beads. Black stretch net petticoat, Crimson sequined shawl with black silk chiffon backing. 1920’s diamante drop necklace
-
- Comments on Phryne’s Liquid Flame Dress
Pharynx’s Gold Beaded Dress worn in Episode 8 “Death do us Part”
-

- Phryne’s Gold Beaded Dress – Cotton and metallic with bugle beads, and gold tulle petticoat, metallic net scarf and gold & crystal headpiece – front view
-

- Phryne’s Gold Beaded Dress – Cotton and metallic with bugle beads, and gold tulle petticoat, metallic net scarf and gold & crystal headpiece – side view
-

- Details of Phryne’s gold and crystal headpiece
-

- Comments on Phryne’s Gold Beaded Dress
Aunt Prudence’s Grand Hotel Dress, worn in Episode 6 “Death at the Grand”
-

- “The Grand Hotel Dress” worn by ‘Aunt Prudence’ – original 1920’s dress converted into a tabard. Black Chantilly lace middle layer slip, silver Lurex pattern
-

- Detail of Aunt Prudence’s Grand Hotel dress collar
-

- Detail of Aunt Prudence’s Grand Hotel dress sleeve
-

- Detail of Aunt Prudence’s Grand Hotel dress sleeve cuff
-

- Detail of Aunt Prudence’s Grand Hotel dress waist and skirt
-

- Comments on Aunt Prudence’s Grand Hotel Dress
Cec ‘n’ Bert and spoils of war (i.e. props)
-

- Phryne, Cec and Jack
-

- Some of Mr Buttler’s props
-

- Looks like someone’s robbed a bank
-
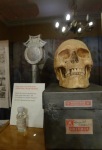
- Some more props – can’t forget that microphone (or skull)
-

- A jewelled hair clip with a Police Evidence Tag
-
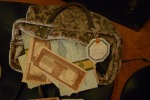
- Carpet travel bag and money, stolen from the Grand Hotel
-

- Half a face and some daggers
-

- Tins of tomato paste
-

- Comments on sourcing materials and props – Robert Perkins, Production Designer
Bert’s Outfit
-

- Bert’s costume – Cotton twill dust-coat, cotton shirt with wool vest, heavy work wear linen pants
-

- Detail of Bert’s shirt, vest and dust-coat
Cec’s Outfit
-

- Cec’s costume – Woollen flatcap, Cotton twill dust-coat, cotton short and vest, original cotton drill work wear pants
-

- Details of Cec’s vest and shirt collars
-

- Detail of Cec’s vest, belt, coat and pants
-
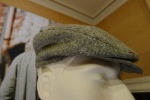
- Detail of Cec’s flat cap
Jack’s Suit
-

- Jack’s Suit – Navy blue woollen three-piece suit with cream silk shirt, maroon and cream knit woollen tie. Taupe with silk shot lining overcoat and brown felt fedora
-

- Detail of Jack’s tie and shirt
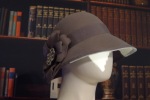
Phryne’s Detective Outfit
-

- Phryne’s Detective outfit – Black and white circle print silk blouse with scarf, black faille camisole and trousers, cream linen coat and cream detective hat, cream crotched and leather driving gloves
-

- Detail of Phryne’s cream detective hat
-

- Detail of Phryne’s driving gloves
There were Dot, Phryne and Aunt P’s costumes in the next room, which was set up to look like Phryne’s living room…


Dot’s Peach Theatre Dress, worn in Episode 1 “Death Defying Feats”
-
- Dot’s “Peach Theatre Dress” – Peach silk chiffon with tea coloured 1920’s lace pieces remounted. Mango silk slip
-

- Detail of Dot’s Peach Theatre Dress collar
-

- Detail of Dot’s Peach Theatre Dress waist band and skirt
-

- Detail of Dot’s Peach Theatre Dress’ skirt (left side view)
-

- Detail of Dot’s Peach Theatre Dress sleeve and cuff
Phryne’s Italian Blouse, worn in Episode 3 “Murder & Mozzarella”
-

- Phryne’s “Italian Blouse” Silk Chiffon check louse with black faille camisole and trouser. Deep pile felt hate with feathers
-

- Detail of Phryne’s silk chiffon check “Italian Blouse” and black faille camisole
-

- Phryne’s Deep pile felt hat with feathers by Rose Hudson, worn with “Italian Blouse”
Phryne’s Pebble Coat, worn in Episode 6 “Death at the Grand”
-

- Phryne’s “Pebble Coat” – patterned silk chiffon coat with side godets. Mushroom silk faille tunic and pant. Red straw hat with patterned silk chiffon trim by Rose Hudson
-

- Side view of Phryne’s “Pebble Coat” showing side godets
-

- Detail of front of Phryne’s “Pebble Coat”
-

- Detail of Phryne’s cuff on “Pebble Coat”
-

- Detail of Phryne’s red straw hat matched with “Pebble Coat”
-

- Comments on Phryne’s ‘Pebble Coat’
Phryne’s Coral Dream Coat, worn in Episode 2 “Murder & the Maiden”
-

- Phryne’s “Coral Dream-coat” – silk shot velvet coat, grey faille tunic and trousers, 1920’s straw beret with feather embellishment by Rose Hudson
-

- Godet detail in Phryne’s “Coral Dream-coat”
-

- Bead detail on hem of Phryne’s “Coral Dream-coat”
-

- Cuff detail on Phryne’s “Coral Dream-coat”
-

- Detail of Phryne’s 1920’s straw beret with feather embellishment by Rose Hudson, matched with “Coral Dream-coat”
-

- Rear detail of Phryne’s 1920’s straw beret with feather embellishment by Rose Hudson, matched with “Coral Dream Coat”
-

- Side detail of Phryne’s 1920’s straw beret with feather embellishment by Rose Hudson, matched with “Coral Dream Coat”
Phryne’s Maroon Spot Fill Coat, worn in Episode 5 “Death & Hysteria”
-

- Phryne’s “Maroon Spot Frill Coat” with mushroom silk lining, sand silk faille tunic and pant, and 1920’s fine straw hat with feathers and hand-dyed silk organza petals by Mandy Murphy
-

- Front of Phryne’s Maroon Spot Frill Coat
-
- Collar detail of Phryne’s Maroon Spot Frill Coat
-

- Cuff detail on Phryne’s Maroon Spot Frill Coat
-

- Detail of Phryne’s 1920’s fine straw hat with feathers and hand-dyed silk organza petals, matched with Maroon Spot Frill Coat
Phyrne’s Chinoise Coat, worn in Episode 2 “Murder & the Maiden”
-
- Phryne’s Chinoise Coat – Black and midnight blue and purple Chinoise with purple silk trims. Original 1920’s silk embroidered motifs. Navy faille camisole and trousers. Blue silk organza floral brooch (courtesy of Lyn Smith) and Purple felt cloche with 1920’s embroidered motif by Rose Hudson
-

- Detail of Phryne’s Chinoise Coat – purple cuffs and trims
-

- Collar detail of Phryne’s Chinoise Coat
-

- Detail of Phryne’s Chinoise Cost
-

- Detail of Phryne’s purple felt cloche hat with 1920’s embroidered motif by Rose Hudson, matched with Chinoise Coat
Aunt Prudence’s Floral Dress, worn in Episode 5 “Death & Hysteria”
-

- Aunt Prudence’s Floral Dress – patterned textured floral silk chiffon dress Original early 1920’s cream handmade needle late collar. Cream silk slip. Diamante brooch reproduction of a Raj
-

- Bodice detail of Aunt Prudence’s Floral Dress
-
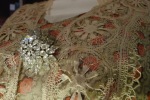
- Lace detail of Aunt Prudence’s Floral Dress and reproduction Raj brooch
-
- Brown felt hat on Aunt Prudence model with brown ribbon and flower on decoration. (No formal descripton provided)
-
- Comments on Aunt P’s Floral Dress
The next room was devoted to Phryne’s costumes worn in Episode 1 “Death Defying Feats”


Phryne’s Imperial Blue Embroidered Kimono, worn in Episode 1 “Death Defying Feats”
-

- Phryne’s Imperial Blue Embroidered Kimono – 1920’s embossed and embroidered silk, courtesty of Katrina Pickering
-
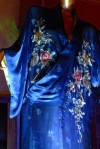
- Detail of Phryne’s Imperial Blue Embroidered Kimono – front sash
-

- Detail of Phryne’s Imperial Blue Embroidered Kimono – left side
Phryne’s Mermaid Coat, worn in Episode 1 “Death Defying Feats”
-

- Phryne’s Mermaid Coat – Whisper green tinted silk chiffon with turquoise and green embroidery. Sea green and silver net lining. Shot blue silk organza scarf and bind. Fine straw hat with 1920’s pompom organza and feather by Rose Hudson
-

- Detail of Phryne’s Mermaid Coat – embroidery on bodice
-

- Detail of Phryne’s Mermaid Coat – sleeve embroidery and cuff
-

- Detail of Phryne’s Mermaid Coat – embroidery detail and net lining
-

- Phryne’s fine straw hat with 1920’s blue pompom organza and feather, by Rose Hudson, matched with Mermaid Coat
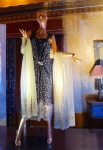
Phryne’s Mermaid Costume, worn in Episode 1 “Death Defying Feats”
-

- Phryne’s Mermaid Costume from front – antique luminescent sequins and gold Lurex. Shot sea green metalic thread fabrication with antique gold metalic threat bind tail. Gold turban with green crystal beads
-

- Detail of scales on Phryne’s Mermaid Costume from front
-

- Phryne’s Mermaid Costume from behind – antique luminescent sequins and gold Lurex. Shot sea green metalic thread fabrication with antique gold metalic threat bind tail. Gold turban with green crystal beads
-

- Detail of Phryne’s Mermaid Costume from behind
-

- Detail of Phryne’s gold turban worn with Mermaid Costume
Phryne’s Black and Gold Lace Dress, worn in Episode 1 “Death Defying Feats”
-
- Phryne’s Black and Gold Lace Dress – Black net with burnished gold floral embroidered design and edging with burnished gold lace border. Black silk slip. 1920’s clasp gold with floral pearl details. Antique tulle wrap with burnished gold lace border
-

- Detail of Phryne’s Black and Gold Lace Dress – front to waist
-

- Detail of Phryne’s 1920’s gold clasp with floral pearl details on Black and Gold Lace Dress
-

- Detail of wide burnished gold lace border on Phryne’s Black and Gold Lace Dress
Phryne’s Lace Tabard, worn in Episode 1 “Death Defying Feats”
-
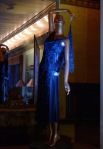
- Phryne’s Lace Tabard – left side profile – French navy lace and beaded tabard with bias cut midnight blue slip with diamond tabs
-

- Detail of diamond tabs on Phryne’s Lace Tabard
-
- Phryne’s Lace Tabard – extra lace forms a cape attached to a bangle
-
- Phryne’s Lace Tabard – front profile – French navy lace and beaded tabard with bias cut midnight blue slip with diamond tabs
Leaving Episode 1 and moving upstairs…
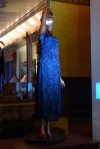
Phryne’s Twilight Ruffle Dress (one of my favourite ensembles!), worn in Episode 5, “Death & Hysteria”
-

- Phryne’s Twilight Ruffle Dress – 1920’s twilight blue embossed silk bias cut with blue lace capelet. Navy lace handbag. Green fine straw hat with green feather trim, by Gareth Blaha. Hand painted and lacquered parasol
-

- Phryne’s Twlight Ruffle Dress & Blue Lace Capelet & matching handbag from front
-

- Detail of Phryne’s Twilight Ruffle Dress and Capelet
-

- Detail of Phryne’s blue lace capelet, won with Twilight Ruffle Dress
-

- Detail of Phryne’s navy lace handbag – same fabric as capelet of Twilight Ruffle Dress
-

- Detail of Phryne’s Twlight Ruffle Dress – ruffles in the skirt
-

- Detail of Phryne’s Green fine straw hat with green feather trim by Gareth Blaha
-

- Comments on Phryne’s Twilight Ruffle Dress and matching the hat
Phryne’s Antique Olive Dinner Frock, worn in Episode 6 “Death at the Grand”
-

- Phryne’s Antique Olive Dinner Frock – from front – 1920’s olive embossed silk boas cut silk chiffon inserts. Antique brass buckle with antique gold chain and beads, tabard back and godet sides. Olive feather stole
-

- Phryne’s Antique Olive Dinner Frock – left side view – 1920’s embossed silk bias cut silk chiffon inserts. Antique brass buckle with antique gold chain and beads, tabard back and godet sides, olive feather stole
-

- Detail of Phryne’s Antique Olive Dinner Frock – tabard join at left hip and beading across pelvis
-

- Detail of neckline on Phryne’s Antique Olive Dinner Frock – 1920’s olive embossed silk, antique gold chain
-

- Phryne’s Antique Olive Dinner Frock from behind – showing tabard back, antique gold chain and antique brass buckle
-

- Detail of Phryne’s Antique Olive Dinner Frock – Antique brass buckle, godet, and antique gold chain
-

- Comments on Phryne’s Antique Olive Dinner Frock
It wasn’t just room after room of costumes… In one of the back corner rooms upstairs, visitors were invited to draw their own costume designs for Phryne…

A chance to design your own costume for Miss Phryne Fisher
…and in the next room we discovered a mock-up of the sewing/designing workroom, and some of the stories behind what goes into making these fabulous creations.
-

- In the sewing room (mock-up)
-
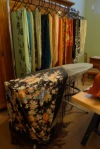
- Shawls and wraps, the one on the ironing board is being worked on
-

- In the costume designers workroom
-

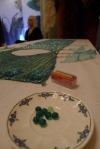
- Feathers and beads – all fascinating!
-

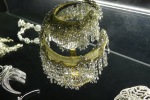
- Test patches for the embroidery on Phryne’s Funeral Coat, marks of the Bottletop Gang, and scales for Mermaid costumes
-

- Sequin ‘scales’ in a goblet, ready to be sewn with gold thread
Phryne’s Chinoise Coat, worn in Episode 1 “Death Defying Feats”
-

- Phryne’s Chinoise Coat – Eggshell blue chinoise with silver silk trim, grey silk scarf with embroidery
-

- Detail of Phryne’s Chinoise Coat – buttons and pocket
-

- Detail on Phryne’s Chinoise Coat – embroidery, sleeve cuff and pocket
Pharynx’s House Coat, worn in Episode 7 “Game, Set & Murder”
-

- Phryne’s House Coat – 1920’s silk organza with silk embroidered butterflies and remounted cotton and metallic embellishments
-

- Detail of Phryne’s House Coat – collar and fastenings
-

- Detail of Phryne’s House Coat – embroidered butterflies
-

- Detail of Phryne’s House Coat – fastenings and front embroidery
Phryne’s Mint Tabard Dress, worn in Episode 1 “Death Defying Feats”
-

- Phryne’s Mint Tabard Dress – 1920’s green silk net with luminescent sequins and bugle beads
-
- Large green beads being attached to Phryne’s Mint Tabard Dress
-

- Comments on Phryne’s Mint Tabard Dress
Phryne’s Lace Bolero (Not yet worn in series!)

Phryne’s Lace Bolero – Turquoise silk needle lace with vintage silk ribbon (not worn yet)
Phryne’s Funeral Coat, worn in Episode 3 “Murder & Mozzarella”
-

- Phryne’s Funeral Coat – Black silk with black silk velvet ribbon with hand-dyed embroidery
-

- Detail of Phryne’s Funeral Coat embroidery
-

- Comments on Phryne’s Funeral Coat
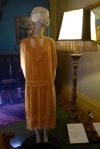
Phryne’s Morning “Muppet” Set, worn in Episode 7 “Game, Set & Murder” and dressing table
-

- Phryne’s Morning ‘Muppet’ Set – Salmon rose silk pyjama set with Peach pink and tangerine marabou capelet with peach silk tie
-

- Detail of Phryne’s Morning ‘Muppet’ Set – embroidered Salmon rose silk pyjama set with peach pink and tangerine marabou capelet with peach silk tie
-

- Detail of Phryne’s Morning ‘Muppet’ Set – embroidery on pant leg
-

- Comments on Phryne’s Morning ‘Muppet’ Set
-

- Phryne’s dressing table
-

- Phryne’s dragon-backed brush and mirror set
-

- Phryne’s beauty products
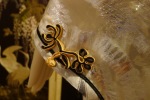
Phryne’s Silk Kimono, worn in Episode 7, “Game, Set & Murder” and bathroom items
-

- Phryne’s Silk Kimono – Patterned chiffon bas with Lurex threads, black Russia braid trim with antique gold frogs and 1920’s crystal drops
-

- Detail of Phryne’s Silk Kimono – back crystal drops
-
- Detail of Phryne’s Silk Kimono sleeve cuff
-

- Front detail of Phryne’s Silk Kimono and silver pearl silk camisole
-

- Comments on Phryne’s Silk Kimono
-

- Phryne’s house (bathroom?) slippers
-
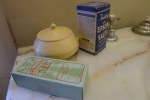
- Bathroom essentials in the 1920’s
Medicinal supplies from the 1920’s, on display in the hallway

Phryne’s Day Ensemble, worn in Episode 8 “Death do us Part”
-

- Phryne’s Day Ensemble – pink champagne printed silk blouse with cream silk jersey camisole, and navy faille trousers
-

- Front detail of Phryne’s Day Ensemble
-

- Detail of Phryne’s sleeve – Day Ensemble
-

- Blouse hem detail of Phryne’s Day Ensemble
Constable Hugh Collins Police Uniform, courtesy of the Victorian Police Museum
-

- Constable Hugh Collins – Police Uniform – courtesty of the Victorian Police Museum
-

- Constable Hugh Collins uniform
-

- Button on Hugh’s police jacket
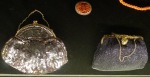
And there, in the final room for the day, was a display of a selection of Phryne’s accessories, from the private collection of Marion Boyce.
Items in the first display case:
-

- A collection of Phryne’s bags, clasps, purses and jewellery
-

- Amethyst necklace
-

- Beaded drawstring and clasp bags, jewelled brooch and necklace
-

- Black and cream embroidered clasp clutch
-

- Black beaded back with floral design and gold snake-chain handle
-

- Black beaded clasp with three flower design, and beaded handle
-

- Black beaded clasp with three flower design, and beaded handle
-
- Black velvet bach with gold chain and jewelled clasp
-

- Blue and gold embroidered clasp clutch bag
-

- Blue beaded clasp handbag
-

- Blue beaded woven handbag
-

- Blue cloth clasp handbags
-

- Blue crocheted clasp handbag
-

- Brooch and bracelet
-

- Chain purse with green velvet ribbon tie
-

- Clasps, necklaces, bangles, brooches, bracelets – beads, gems, bakelite, red velvet
-

- Floral brooches
-

- Gold bracelet (didn’t photograph well) and red bead bangle
-

- Grey pearl, green gem and gold leaf necklace. Amethyst and antique gold or brass necklace
-

- Grey woven clasp handbag
-

- Jade bracelets with gold features
-

- Jade necklaces, blue flower hairclip, green brooch
-

- Jade pendant
-

- Olive green sequin and beaded clasp clutch handbag
-

- Red Chinese brooch, orange bangle, diamonte bracelet, red beaded bracelet, necklace
-
- Rose-silver sequined and gold clasp, black beaded clasp and a red chinese brooch
Items in the second display case:
-

- Brooch (I think)
-

- Bow and leaf design brooches
-

- Diamond bracelet
-

- Diamond bracelet and necklace
-

- Gold arm bangle, brooches, yellow leather bag with fine gold lines and a beaded clasp
-

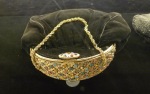
- Gold beaded handbag with clasp, gold necklace with amber pendant, gold link bracelet, jewelled brooches
-

- Gold fine chain purse with jewelled clasp, brooches
-

- Gold sequined claps handbag and antique gold leaf and flower hair slide
-
- Head piece I think – I’m not sure what this is
-

- Jewelled antique gold hair slide with leaf pattern
-

- Jewelled brooch
-

- Jewelled brooch
-
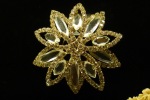
- Jewelled flower brooch with large gems
-

- Jewelled hair slides
-

- Jewelled hair slides and brooch
-

- Jewelled necklaces and brooch
-

- Jewelled necklaces and brooches
-

- Jewelled star burst brooch with twisted arms
-

- Jewelled starburst brooch
-

- Necklace – string of 7 diamonds
-

- Ornate jewelled hair slide
-

- Pearl brooch and jewelled flower-shaped brooch
-

- Phryne’s gold and pearl-handled revolver, pistol, Smith & Wesson
-

- Sequined collar
-

- Yellow floral brooch, possibly made of bakelite
Somewhat mind-blowing to think this was just a selection of Phryne’s accessories. Imagine how much more there is!
If you are a fan of Miss Fisher’s Murder Mysteries (#MFMM) and have a chance to see the costume exhibition – hopefully they take it on tour, like last time – I think it’s well worth it, and our tickets were not expensive at $20 each. If it doesn’t tour to your part of the world, I hope my post has brought you some satisfaction.
If you haven’t seen my other posts on the previous MFMM costume exhibition or Rippon Lea Estate, why not take a moment to check them out now? I’ve also posted about the (rather smaller) Doctor Blake costume exhibition that was on display in Ballarat last June (2014).
: )


 & previous methods of illumination - Wilsons Promontory Lighthouse - South East Point")


 - Wilsons Promontory National Park Lightstation")
 - Wilsons Promontory National Park Lightstation")


